Filing a roof damage claim with your insurance company can be a daunting process, especially if you have never done it before. However, it is important to know that your homeowners’ insurance policy is designed to protect you and your property from damages caused by severe weather, including hail, high winds, and hurricanes. If your roof has sustained damage from a recent storm or other weather event, you may be entitled to compensation from your insurance company to cover the cost of repairs or even a full roof replacement. In this step-by-step guide, we will walk you through the process of filing a roof damage claim with your insurance company.
Step 1: Inspect Your Roof for Damage
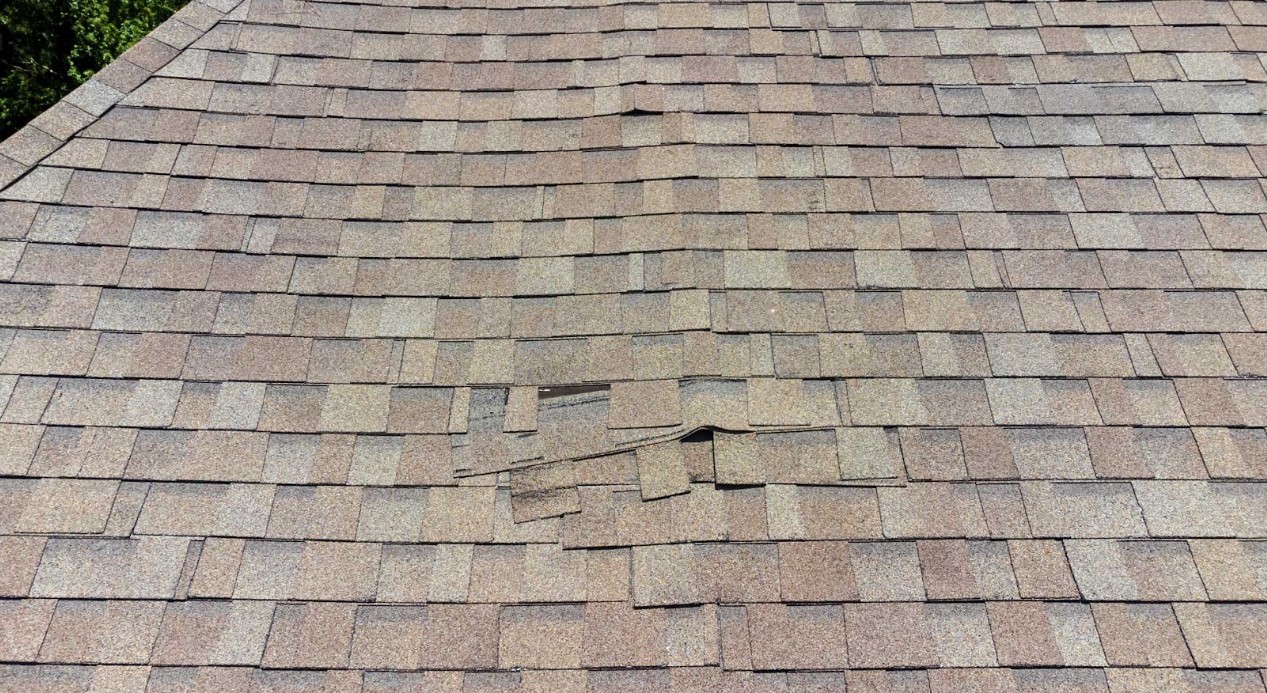
The first step in filing a roof damage claim with your insurance company is to inspect your roof for any damage. Keep in mind that many types of storm damage may not be obvious and cannot be seen from the ground. This is a very common mistake that homeowners make, assuming their roof is fine just because they can’t see any damage from the ground. It’s essential to conduct a thorough inspection of your roof after a storm to identify any potential damage. Many reputable roofing contractors offer free roof inspections to identify any storm damage to your roof.
Here are some signs to look for:
Hail damage:
- Dented or dinged metal components like gutters, vents, and flashing
- Dents on asphalt shingles that look like dark spots or bruises
- Missing granules on asphalt shingles, which may expose the underlying black felt
- Holes or cracks in slate, tile, or concrete shingles
- Soft spots on wooden shingles or shakes
Wind damage:
- Creased shingles, which are shingles that have been bent from winds but are still in place
- Missing or damaged shingles, especially around the edges or corners of the roof
- Missing or damaged flashing, which is the material used to seal roof joints and prevent water intrusion
- Loose or damaged gutters and downspouts
- Debris, such as tree branches or debris from nearby structures, on the roof
If you notice any of these signs, it’s important to take action and have your roof inspected by a professional as soon as possible. Waiting too long to address storm damage can result in further damage to your roof and potentially even water damage to the inside of your home.
Step 2: Contact Your Insurance Company to File a Claim
When it comes to filing a roof damage claim with your insurance company, it’s important to have all the information you need before making the call. This is where HomeSource can help. As experienced roofing contractors, we’re happy to provide assistance to homeowners when it comes to filing a claim. By involving us early on in the process, you can have all the answers you need to make the best decisions for your roof.
To begin the claim process, don’t call your insurance agent directly. Instead, find the 24/7 claims hotline that is typically listed on your insurance company’s website. Many major carriers now offer online claim filing or even mobile apps for convenience. Once you’ve found the right contact information, give the insurance company a call and provide all necessary details about the damage to your roof. This typically includes the date of the storm, the type of damage that occurred, and your policy number.
It’s important to note that filing a claim can be a complicated process, especially if you’re not familiar with the insurance industry. This is why involving your roofing contractor from the beginning can be a major advantage. They can help you understand the claims process and make sure that you receive the full benefits you’re entitled to under your policy. Don’t hesitate to contact HomeSource for assistance with your claim. We’re here to help you every step of the way.
Step 3: Meet with the Insurance Adjuster
Once you have filed your claim, the insurance company will send an adjuster to inspect your roof and assess the damage. This is an important step in the process, as the adjuster will determine the amount of damage to your roof and whether or not it is covered under your policy.
It is recommended that you have a licensed and experienced roofing contractor present during the adjuster’s inspection. This will ensure that all damage is properly identified and documented, and that the adjuster is aware of any necessary repairs or replacements.
When meeting with the adjuster, be sure to provide any documentation or evidence of the damage, such as photos or videos. Also, be prepared to answer any questions the adjuster may have about the age and condition of your roof, as well as any previous repairs or maintenance.
It’s important to note that insurance adjusters are not contractors and their primary goal is to assess the damage and determine if it is covered under your policy. They may not have the expertise to identify all damage or recommend the best course of action for repairs or replacements. This is why having a roofing contractor present can be so beneficial.
If the adjuster approves the claim, they will provide you with a written estimate of the repairs or replacement that are covered under your policy. If the claim is denied, you can appeal the decision by requesting a second inspection or through other options available to homeowners.
In either case, be sure to keep a record of all communication with the adjuster and insurance company, including any written estimates or denials. This can be helpful if you need to provide documentation to your roofing contractor or if you need to appeal the decision in the future.
Remember, the insurance claims process can be complex and overwhelming, especially if you are not familiar with the industry. HomeSource is here to assist you every step of the way, from filing your claim to meeting with the adjuster and beyond. Our experienced team can answer any questions you may have and help ensure that your claim is properly filed and approved.
Step 5: Receive the Adjuster’s Decision and Claim Settlement
Once the adjuster has evaluated the damage and submitted their report to the insurance company, you’ll receive a decision on your claim. The adjuster may approve the full amount you’ve requested, approve a partial amount, or deny the claim altogether.
If the adjuster approves your claim, you’ll receive a settlement offer from the insurance company. This offer should include the estimated cost of repairs or replacement, minus your deductible. If you’re satisfied with the offer, you can accept it and move forward with the repairs.
However, if you’re not satisfied with the offer, you have the option to negotiate with the insurance company. It’s important to note that negotiating with insurance companies can be a challenging and time-consuming process, and it may be helpful to have a contractor or public adjuster on your side to help you navigate this step.
Once you’ve reached an agreement with the insurance company, they will issue a check for the settlement amount. This check may be made out to you and your mortgage company if you have a mortgage on your home. If you have a contractor working on the repairs, they may also be listed on the check as a payee.
It’s important to carefully review the settlement offer and understand your rights and options throughout the process. If you have any questions or concerns, don’t hesitate to reach out to your insurance company, contractor, or a public adjuster for assistance.
Step 6: Sign Final Paperwork and Select Your New Roof Color
Congratulations! You’ve made it to the final step of the process. Now it’s time to sign the final paperwork and select the color of your new roof. This is the fun part!
When you have an insurance claim settlement, your contractor will perform the work directly off of that settlement. It’s crucial to understand that the contractor won’t provide you with a quote in this case. This is because the final invoice must match the claim settlement, which the contractor will submit to your insurance company for payment.
It’s essential to ensure that the contractor’s final invoice is not less than the insurance settlement. If it is, the insurance company will withhold the difference, and the homeowner won’t receive the excess funds. Some homeowners think they can save money by shopping for quotes less than the insurance settlement and pocketing the difference. However, this is a big mistake and illegal, as it constitutes insurance fraud.
When signing the final paperwork, you’ll have the opportunity to select a new roof color. Once you’ve signed the final paperwork and paid a deposit your contractor will begin scheduling your roof install.